 |
| Katazoom on Etsy |
Cute right? I thought so and figured I would have a little fun with the newly found phrase. What did I come up with? Cardboard Pants. Yep.
Wearable? Nooooo. Hangable? Yeeeessss. Super cute? Definitely!
It took some trial and error but I'm happy with how they came out. Want some cute pants of your own? Here's how to make them:
Supplies
piece of cardboard
pair of baby jeans (the ones I used were 12 month size)
pencil
scissors
sand paper
two sheets of 12 by 12 scrapbook paper
ruler
ink pad (or ink and a medium sized paint brush)
"Laundry Loads of Fun" typed and printed in actual size needed
panties and sock clipart printed in actual size needed
very fine paint brush
medium sized paint brush
acrylic paint in white and a pink-red
Modpodge
button
1. The piece of cardboard I used was a top to a fancy makeup set I got forever ago.
Unfortunately this happened to be made out of industrial strength cardboard which might as well have been wood. The cutting part was a little rough...
2. Grab those cute little baby pants (if you or a friend don't have any lying around then Goodwill is a great place to find baby clothes for super cheap), lay them out on your cardboard and trace.
3. Remove pants (the ones on the cardboard silly) and cut out your outline.
4. As you can see my edges were a little rough so I used some sand paper to smooth them out. Never thought you would be sanding down cardboard did you? Me neither.
But look how much it helped!
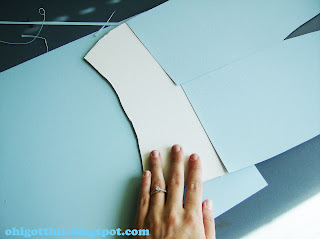
5. Take one of your pieces of scrapbook paper and trace one of the legs from the bottom of the pant leg to however close to the waistline as you can get, then the other. Cut the legs out and lay on top of your cardboard pants. One of the legs will be overlapping the other.
6. Measure the 'waistline' with your ruler, find the center and mark it.
7. Using your ruler trace a line from the center you just marked of the waistline to the bottom of the crotch area.
Cut off the excess paper you just marked on the overlapping pant leg. You will now have a straight 'seam' connecting the two legs.
8. Trace the uncovered top part of your pants plus an inch or so past the top of the legs on your second piece of scrapbook paper.
Cut out the waist tracing and place on top of the cardboard.
9. Use your ruler and pencil to lightly mark on the waist tracing the two outer corners of the leg pieces.
Cut in a curve from the first marked corner to the second so that your waist piece of paper has a curved lower half. Erase any pencil markings that remain.
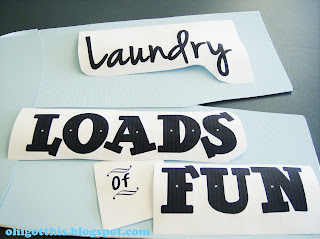
10. Set your pants aside and grab your printed out witty phrase and clipart.
Flip them over and color the back side of the words and clipart with your pencil, excluding the word Laundry. Be sure that you well cover the outlines.
I do not have the clipart shown here because I didn't know I wanted to add those on until later. The word Laundry is also colored here but I decided to do a different stenciling method with it later on so please ignore the discrepancies.
11. Cut out the words and place on your pants where you would like them. Keep in mind that your pant tracings are not glued into place yet so be sure those are in the proper position as well.
Now trace over the phrase (excluding the word Laundry) and clipart's outlines with medium pressure. MEDIUM. No one wants torn pants...in this case anyways.
Remove the phrase and clipart to find a light tracings of them on your paper! Hooray!
12. Are your pants looking a little plain? Let's spunk them up with that ink pad. Lightly rub or brush the ink (I used a dusty rose color) on the edges of your scrapbook paper.
13. Using your fine paint brush fill in the tracings on your pants. This part can get tedious. Just a warning. If you are a painter or have one of those fancy stencil making machines I would utilize those things/talents now. And know I am terribly jealous.
14. As I said that last step can get tedious, and it did, so I decided I'd figure out another method for the word Laundry. I'm calling it 'Free Reverse Stenciling'.
Cut out your printed word Laundry.
VERY lightly brush on some Modpodge onto the backs of the letters and place on your top pant leg where you would like them- the Modpodge is so that the letters will stick in place while you brush over them. Quickly before the Modpodge completely dries brush over the letters. To prevent bleeding under it helps if you brush from the inside of the letters out. Now remove the letters carefully. If you don't trust your fingers use some tweezers.
TaDaa!
15. Spread some Modpodge on the back of your button and place it on the top part of your pants and your done!
Now enjoy your hard work:
Final Touches:
- for the clothes line I braided three pieces of hemp. I just thought it looked better than a single line.
- it's hard to tell, but I did Modpodge the clothespins. It adds a little something.


This is so adorable!
ReplyDeleteWe'd love to see this at our Beautify it Monday link party open now!
-Four Sisters
Bringingbeauty.blogspot.com
Sorry I didn't make it to your party! I will definitely be there next week though. Thank you for the invite :)
DeleteThis is so darn cute!! Thanks for coming to our "Strut Your Stuff Saturday." We hope you'll be back soon! -The Sisters
ReplyDeleteThank you and I will!
DeleteCute sign...and saying too! Thanks for entering One Crafty Contest; good luck!
ReplyDeleteThank you!
DeleteCute! you're right, that saying is really fun.:)
ReplyDeleteThis is super Cute.
ReplyDeleteThank you!
DeleteSuch a cute sign! I am visiting form the One Artsy Mama Craft Contest and wanted to drop by and say hi. I am a new follower! I hope you will stop by http://www.garagesalesrus.blogspot.com/ and do the same.
ReplyDeleteRobin