June 8, 2012

Free BYU Independent Study Courses

Learning makes you feel good doesn't it? You feel accomplished, less "in the dark", more able to take on your daily life with better understanding and capacity. You can better avoid those awkward conversations where you have nothing to contribute. It can be a pain but then it can also be enjoyable commiserating with fellow learners.

Picture Courtesy: Mind Petals.com

I'm pretty sure most people would call me a nerd for that paragraph...

Anywho, learning can unfortunately be extremely pricey. That is why I was ridiculously excited (just pin a nerd pin on my chest, apparently it belongs there) when I found FREE online independent study classes from BYU! Woohoo!

They aren't graded and therefore do not provide any college credit, BUT you get some quality teaching on some great subjects for $0. Verrrrrry niiiiiiice.

So, what do they offer? You can check it out HERE at the BYU Independent Study website. 

I'm starting off with their personal finance course and it's been great so far.

Making something of myself for zero moola? Oh, I Got This!

June 4, 2012

Free Printable Planner: Monthly Calendars

This is the third and final part of the planner! I've got the months of June and July here and let me tell you making a planner is hard work. A new admiration for those who create the things has blossomed inside of me.

Print Me :)
Print Me :)
Feeling more organized? Me too :)

June 2, 2012

Free Printable Planner: Master To-Do and Shopping Lists

This is the second installment of the free planner! I like to have a master to-do list to plan my days out from and a master shopping list to plan my shopping trips from. It makes it so I don't forget anything (which makes life a lot less frustrating).

Print Me :)

Print Me :)
More pages are still to come so keep checking back!

Making my life less frustrating? Oh, I Got This!

May 31, 2012

Free Printable Planner Page (Yay Free!)

Ever get the feeling you are wasting your life? I do just about every time I don't plan my day out. But none of the planner's you get at the store fit perfectly so I decided to throw together one of my own.

Print Me :)
 Organization with Pretty Colors!

I'm working on a Master To-Do list and other planner pages to go along with this one so check back soon or follow me to get a full planner lay out.

*For printing: I designed this page to be an A5 size (5.83 x 8.27) so it will be in it's very best quality when printed at that size. The quality is still good when printed on regular paper just not at it's best. All you have to do is click on the link under the above picture, click the print button in Google Docs, select the printer you wish to print from, hit Properties in the top right hand corner of the pop up print box, another box will pop up in which you select the Paper/Quality tab, click Custom for the size and type in 5.83 for the width and 8.27 for the height.
A5 paper size can be found at Empire Imports where it is $9/ ream or you can use a paper cutter.


Not wasting my life? Oh, I Got This!

I'm partying with  these SWEET blogs

May 28, 2012

Less Annoying (and More Cheap) Baby Proofing

Recently my son has discovered the ever flowing amount of trouble he can tap into behind the no longer elusive cabinets. For the first while I was running around trying to block or close the doors but that method proved inefficient and tiring (though amusing for my family I think). But I have been to homes where those little baby door locks are in use and it's so annoying! I would just about rather keep up the running around.

Thankfully my Mom came up with this wonderful idea:


So you know those Velcro damage-free picture hanging strips you can buy? Yeah, those work amazing for warding off baby pilfering. 
All you do is buy a pack (ranging from 3-7 dollars depending on how many are in the package- I used the Command brand) ,cut them in half, and place the loop side (the fuzzy side) on the cabinet where the door shuts...
 ...and the hook side (the non-fuzzy side) on the actual cabinet door.
Instead of having to take five minutes to get the flour you needed ten minutes ago by fiddling with baby locks, you can now take seconds with this trick. You do need to be sure you close the doors well though or the Velcro won't stick super strong. 

Making life with a baby easier? Oh, I Got This!

May 21, 2012

Best Ever Chewy Chocolate Chip Cookies: Keeper or Stinker?

Gooey-chocolatey-sugarified-yumminess. That is what chocolate chip cookies are and there is just no getting around it (can you tell they are a favorite of mine?) Many recipes have striven to perfect this delectable dessert so let's see how this Pinterest find matches up:

Best Ever Chewy Chocolate Chip Cookies


This recipe is simple and has one unique ingredient that I have not found in too many cookie recipes: corn starch. It added a little smoothness to the texture and is, I think, where the extra chewiness of these cookies comes from. 
The cookies tasted delicious, though I'm not sure that they beat my all time favorite (Original Nestle Toll House Chocolate Chip Cookies). In the recipe it says not to cook them longer than ten minutes but mine definitely needed to stay cozy in the oven a while longer than that. I think it is due to an altitude difference so be careful about the cooking time or you'll end up with too-chewy cookies.

Bottom Line
Pros:

  • Easy
  • Chewy
  • Very Tasty
  • Not greasy
Cons:
  • Cooking time varies
Tips:
  • Closely watch the cooking time, mine needed to cook a few minutes longer than the recipe read but remember that all cookies bake a slight amount more on the baking sheet after they are pulled out.
  • Super flat, spread out cookies? be sure you aren't greasing your baking sheet if it isn't asked for and cool and wash the sheets between batches. Or you can chill the dough a little before baking. 


Keeper or Stinker?

Keeper! 

Link Partyin' With:
  Tip Junkie handmade projects

May 18, 2012

Ho-Ho-Ho, Haappy Birrthday!

May is Birthday month. My husband, son, brother, and various other relatives all have their special day in this lovely month. First up is my husband who happens to be a big fan of Ho-Ho's. So my mom and I whipped up a Ho-Ho's cake!


It is easy, fast, cheap, and scrrrrrrumptious. Can't beat that combo. 

Supplies:

  • 20 Ho-Ho's
  • cake platter or plate
  • ribbon
  • a tube of cake icing with decorative tip
  • Birthday candles
How To:

 1.Open all your Ho-Ho's and group them together in a circle vertically.


 2. Tie your ribbon around the grouped Ho-Ho's (someone's finger would be handy right about now).


3. Decorate the bottom of the "cake" with your icing along with a few spots on top where your candles will go. Place candles and admire.

Making my husband happy with a snazzy three-step cake? Oh, I Got This!

Link Partyin' With:

Tip Junkie handmade projects

April 26, 2012

Laundry, Loads of Fun!

I love witty sayings. Recently I saw this one on Pinterest:

Katazoom on Etsy

Cute right? I thought so and figured I would have a little fun with the newly found phrase. What did I come up with? Cardboard Pants. Yep.


Wearable? Nooooo. Hangable? Yeeeessss. Super cute? Definitely!

It took some trial and error but I'm happy with how they came out. Want some cute pants of your own? Here's how to make them:

Supplies
piece of cardboard
pair of baby jeans (the ones I used were 12 month size)
pencil
scissors
sand paper
two sheets of 12 by 12 scrapbook paper
ruler
ink pad (or ink and a medium sized paint brush)
"Laundry Loads of Fun" typed and printed in actual size needed
panties and sock clipart printed in actual size needed
very fine paint brush
medium sized paint brush
acrylic paint in white and a pink-red
Modpodge
button

1. The piece of cardboard I used was a top to a fancy makeup set I got forever ago.
Unfortunately this happened to be made out of industrial strength cardboard which might as well have been wood. The cutting part was a little rough...

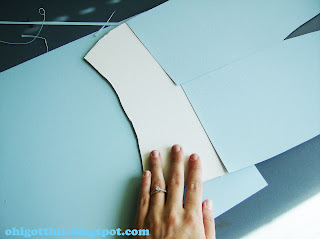
2. Grab those cute little baby pants (if you or a friend don't have any lying around then Goodwill is a great place to find baby clothes for super cheap), lay them out on your cardboard and trace.

3. Remove pants (the ones on the cardboard silly) and cut out your outline.


4. As you can see my edges were a little rough so I used some sand paper to smooth them out. Never thought you would be sanding down cardboard did you? Me neither.
But look how much it helped!

5. Take one of your pieces of scrapbook paper and trace one of the legs from the bottom of the pant leg to however close to the waistline as you can get, then the other. Cut the legs out and lay on top of your cardboard pants. One of the legs will be overlapping the other.

6. Measure the 'waistline' with your ruler, find the center and mark it.


7. Using your ruler trace a line from the center you just marked of the waistline to the bottom of the crotch area.
Cut off the excess paper you just marked on the overlapping pant leg. You will now have a straight 'seam' connecting the two legs.

8. Trace the uncovered top part of your pants plus an inch or so past the top of the legs  on your second piece of scrapbook paper.
Cut out the waist tracing and place on top of the cardboard.


9. Use your ruler and pencil to lightly mark on the waist tracing the two outer corners of the leg pieces.
Cut in a curve from the first marked corner to the second so that your waist piece of paper has a curved lower half. Erase any pencil markings that remain.


10. Set your pants aside and grab your printed out witty phrase and clipart.
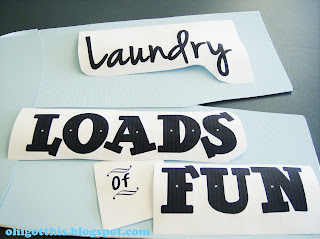
Flip them over and color the back side of the words and clipart with your pencil, excluding the word Laundry. Be sure that you well cover the outlines.
I do not have the clipart shown here because I didn't know I wanted to add those on until later. The word Laundry is also colored here but I decided to do a different stenciling method with it later on so please ignore the discrepancies.

11. Cut out the words and place on your pants where you would like them. Keep in mind that your pant tracings are not glued into place yet so be sure those are in the proper position as well.

Now trace over the phrase (excluding the word Laundry) and clipart's outlines with medium pressure. MEDIUM. No one wants torn pants...in this case anyways.
Remove the phrase and clipart to find a light tracings of them on your paper! Hooray!

12. Are your pants looking a little plain? Let's spunk them up with that ink pad. Lightly rub or brush the ink (I used a dusty rose color) on the edges of your scrapbook paper.

13. Using your fine paint brush fill in the tracings on your pants. This part can get tedious. Just a warning. If you are a painter or have one of those fancy stencil making machines I would utilize those things/talents now. And know I am terribly jealous.

14. As I said that last step can get tedious, and it did, so I decided I'd figure out another method for the word Laundry. I'm calling it 'Free Reverse Stenciling'.
Cut out your printed word Laundry.
VERY lightly brush on some Modpodge onto the backs of the letters and place on your top pant leg where you would like them- the Modpodge is so that the letters will stick in place while you brush over them. Quickly before the Modpodge completely dries brush over the letters. To prevent bleeding under it helps if you brush from the inside of the letters out. Now remove the letters carefully. If you don't trust your fingers use some tweezers.
TaDaa!

15. Spread some Modpodge on the back of your button and place it on the top part of your pants and your done!
Now enjoy your hard work:


Final Touches: 

  • for the clothes line I braided three pieces of hemp. I just thought it looked better than a single line.
  • it's hard to tell, but I did Modpodge the clothespins. It adds a little something.
Having Loads of Fun making some loverly pants? Oh, I Got This!

April 24, 2012

Personal Sized Baked Oatmeal: Keeper or Stinker?

Soooooooo... I might have a um...slight addiction to Pinterest. I've got 64 boards and a little over 1500 pins now- 1541 to be exact.  But who's counting right? 
Anywho, a couple of those boards are dedicated to foody goodness that I have enjoyed sampling. Some have come out tantalizing, others not so much.

You are probably now thinking "alright, this lady's got some issues and likes to make food...so what?" Well this is the "so what?": why make the same mistakes twice? Why not let me review some of those Pinterest sensations for you so you don't end up with a hungry family politely (or not so politely) shoveling down some recipe that was tagged as being the Best Ever when it is obviously not?

Personal Sized Baked Oatmeal

 From: Sugar Free Mom

I kept seeing this recipe pop up all over Pinterest when I finally decided to give in and give it a try. And I am happy I did! These came out great. The recipe was simple and easy to follow, they are customizable, and best of all they are healthy but still tasty! 

Now, if you are looking for a sugary oatmeal muffin you will be disappointed. The only sugar used is either Stevia or honey. If you taste them and want a little more sweetness then put some chocolate chips or jam on top or mix them into the batter. 

These are surprisingly filling. I ate two for breakfast and was good to go. 
They are also great for babies! I smash them up and my son loves them. 

Bottom Line
Pros:
  • Healthy
  • Filling
  • Customizable
  • Easy
  • Freezable
  • Baby-friendly
Cons:
  • Taste healthy
Tips:
  • If using cupcake liners very LIGHTLY spray them with nonstick cooking spray or the liners get soggy and are hard to pull off. 
  • The toppings I tried are Strawberry jam, dark chocolate chips (do less than I did, it was a bit much), sweetened coconut shreds, cut up apple with a sprinkle of cinnamon, walnuts, and Craisins. The ones with Strawberry jam, the cut up apple, and Craisins were the best for my son because I didn't have to take the toppings off. 
Keeper or Stinker?

KEEPER!


Guest Post: Birthday in a Box!

Who better to do a guest post than the one who got me started on craftiness? My Mom (a.k.a. Shela)! She masterfully creates all sorts of things and she has agreed to share one of her secrets with you. And here it is:


Birthday in a Box!


If you can’t be there to throw someone an incredible birthday bash, you can make it feel just as special by sending it in a box. I did this for my son when he was gone on a mission for our church, and my daughter while she was at college.

1. Collect your supplies. At home I already had the following:

a. an empty shoe box (any box which is the right size to hold everything will do)
b. wrapping paper
c. cake mix
d. frosting
e. regular clear tape
f. clear packing tape
Then I went to a party supply store and picked a theme my daughter would appreciate. She’s been a big fan of Scooby Doo for years, so that’s what I picked. Here’s what I bought:

a. 1 eight pack of Scooby Doo dessert plates
b. 1 eight pack of Scooby Doo napkins
c. 8 Scooby Doo blowers
d. A Scooby Doo birthday badge
e. 8 rainbow colored cups
f. Bright green plastic table cover
g. Spongy Scooby Doo ball (just for fun)
h. Happy Birthday tiara
i. Number candles
j. Scooby Doo happy birthday banner
 
2. Open some select items to use in a few photos.
If you can’t be there in person, the next best thing is a picture. It makes the gift even more personal when you use some of the items you’re going to be packing in the box. I pulled out the birthday banner and then took pictures of family members holding it. I also opened the party blow outs for people to use in pictures. Then I put them together and added my rhyme:
This birthday in a box for you
includes a cake & frosting too.
Since we’re not there to share the day,
share it with who’ere you may.
So light the candles, make a wish
and know your birthday we’d never miss!


3. Cover your mailing box to make it look festive.  
 
I am a firm believer in the power of packaging. When the box looks good, it only adds to the delectable anticipation of the receiver. Since I already knew the inside was going to be covered with something else, I just put wrapping paper on the outside of the box.

4. Line the box with the table cover.
5. Pack all of the items inside.
6. Print out your pictures and add a nice note. Include it in the box.

7. With the clear packing tape seal the box well.
8. Add address labels and mail.
 
 
Variations you might want to try:

Little Debbie snack cakes can be substituted in place of the cake mix and frosting. If you’re worried about the mailing cost due to weight, this is a good option. It’s also good for those who might be kitchen challenged.
Hats of any kind are great because they work well in the pictures. One time I found some Spiderman masks that I had the whole family wear for pictures. It was awesome.
 
Helpful suggestion:

To save money on mailing costs, the US Postal Service offers free flat rate priority mailing boxes at any of their locations. If you choose the right box, you’ll pay one flat rate even if the box weighs more than usual.

April 11, 2012

Peeps Jousting

Peeps seem to be an Easter essential but to tell you the truth I'm not the biggest fan of sugar coated sugar fluff- taste wise anyways. So what do you do with the little thingers? My usual after Easter tradition is to let them sit on my counter for however long it takes for me to not feel guilty just throwing them out. A companion my husband had while on his mission (for the Church of Jesus Christ of Latter-Day Saints) had a much better idea. PEEPS JOUSTING!


Peeps + Toothpicks + Microwave = Mallowmazingness!

Arm them, place them, and heat 'em up then watch as the little birdies grow into big birdies and one Peep gets punctured. The victor is named and the tourny continues! Sooooo much better than letting your Peeps turn into raisins on the counter.


Supplies:
Peeps
Multi-colored toothpicks (so you can tell  who's is who's)
Microwaveable plate

How to Joust:
1. Choose your color of toothpick and pierce your Peep. Jousting works best when the toothpick is placed more in the center of the Peep, not too far in, and at a lower angle.

2. Place the newly knighted Peeps facing each other and a few inches apart on your plate, then put your plate in the microwave.

3. If your microwave has a light turn it on to make them easier to see, if not you can see them fine without. Let them joust for about 1-2 minutes and watch as they fight valiantly for their honor while turning into obese Peeps. When one of them gets punctured they generally deflate or ooze out marshmallow goo so it is really very exciting.

Have a tournament with your siblings, make it a cheap date night, or just be silly with your spouse. Who knew Peeps could make for such sport?

Celebrating a new after Easter tradition while giving Peeps a purpose? Oh, I Got This!

Link Parytin' with:

www.bluecricketdesign.net

wearethatfamily.com  

www.theshabbycreekcottage.com 

www.passionatelyartistic.com 

April 9, 2012

It's Ham-mer Time!

Got left over Easter ham? Good! I've got a bunch of ham recipes and ideas, 20 in fact. Grab a few and that ham will go to good use!

1. Cheesy Ham and Potato Soup

2.  Waffles with Ham and Egg

3. Ham Casserole

4. Crock-Pot Ham and Beans

5. Monte Cristo Casserole

6. Ham and Broccoli Quiche

7. Ham Salad Spread

8. Ham Muffinwiches

9. Split Pea and Ham Soup

10. Hearty Ham Casserole

11. Baked Ham and Cheese Omelet Roll

12. Ham and Cheese Sliders

13. Lay it out on a sandwich like this one: Gerber Sandwich

14. Chop it up and throw it in my Golden Macaroni and Cheese

15. Make a batch of hearty breakfast burritos with ham to stick in the freezer for some quick and tasty breakfasts!

16. Mini Ham 'n' Cheese Frittatas

17. Ham 'n' Chickpea Soup


18. Save some moola and make your favorite pizza at home. My favorite is Hawaiian and left over ham tastes devilishly good on it.

19. Ham Stuffed Tomatoes

20. Ham and Corn Souffle

Not feeling like I am eating left-overs five nights in a row? Oh, I Got This!